How to Attach Documents to a Grievance on NBM Portal 2026
When you file a grievance on the NBM Portal (Navasakam Beneficiary Management Portal), attaching the right documents is one of the most important steps. Good supporting files help officials understand your issue, verify your claim faster, and resolve your problem without delays. If your documents are missing, unclear, or incorrect, the grievance might stay “under review” for longer or even get rejected.
This guide breaks down the process of adding documents clearly and simply — so you can submit your grievance confidently and correctly.
Why Attaching Documents Matters
The NBM Portal is used by government officials to review and fix issues related to welfare schemes, family details, caste or land records, application errors, and more. When you attach supporting documents:
In short, clear and correct attachments make a big difference.
Step 1: Know What Documents You Need
Before you even log in, gather the correct files you think will support your request. Common examples include:
For Personal Detail Errors
Aadhaar card
Ration card
Voter ID
For Caste Category Corrections
Caste certificate
Parent’s caste certificate (if needed)
For Land Related Issues
Pattadar Passbook or ROR
Mutation records
Sale deeds
For Income or Eligibility Issues
Income certificate
Pension proof
Salary slips
Tip: Always save these files on your phone or computer so you can upload them quickly when filing the grievance.
Step 2: Log In to the NBM Portal
Once you’re logged in, you’ll see your dashboard where you can file or view grievances.
You can also read:When Will NBM Grievances 2026 Be Reviewed? What to Expect
Step 3: Start Filing a Grievance

This is where you describe what went wrong and why you’re submitting the grievance.
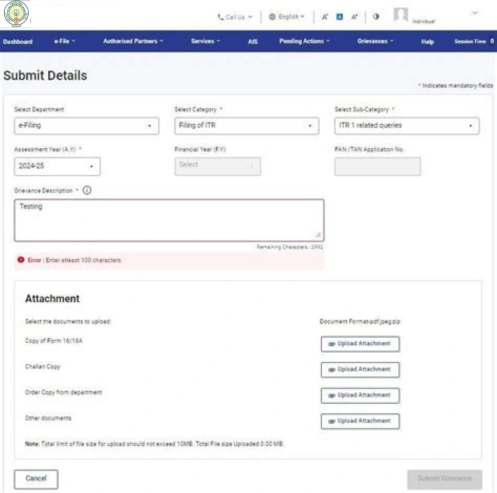
Step 4: Upload Your Documents
Here’s how to attach files:
Look for the “Attach Documents” or “Upload Files” button while filing the grievance.
Click it and select the correct files from your device.
Make sure the documents are:
Clear and readable
In the correct format (usually PDF, JPG, or PNG)
Within size limits (not too large
If you have multiple files, upload each one separately using the upload buttons provided.
Tips for good attachments
Step 5: Review Before Submitting
Before you press submit:
This helps avoid rejection or requests for additional documents later.
Step 6: Submit Your Grievance
Once everything looks correct:
Saving a screenshot of the submitted grievance and attached files is always a good idea.
Step 7: Track Your Grievance Status
To see if your documents helped move the grievance forward:
Go to Grievance Status on the portal.
Enter your Grievance ID or Aadhaar number.
Check the status:
Under Review
Action Taken
Resolved
Needs More Info
If it says Needs More Info, check the message and attach the missing or clearer documents as requested.
Common Mistakes to Avoid
Avoiding these mistakes makes the process smoother and faster.
FAQs
Final Words
Attaching documents to a grievance on the NBM portal doesn’t have to be confusing. By preparing the right files beforehand, uploading clear and readable documents, and reviewing everything before submitting, you greatly improve your chances of a quick and successful resolution.