What to Do If Your Navasakam Application Shows Rejected 2026
If you’ve applied for a government welfare scheme through the YSR Navasakam Portal and your application status shows as ‘Rejected,’ it can be frustrating. But don’t worry! A rejected application doesn’t mean the end of the road. There are steps you can take to resolve the issue and possibly reapply.
In this article, we’ll guide you through what to do if your Navasakam application is rejected. We’ll cover the common reasons for rejection, how to address them, and what steps you should follow next.

Common Reasons for Application Rejection
Before jumping into the solutions, it’s important to understand why your application might have been rejected. Some common reasons include:
Incorrect Information
If the details you entered (like your Aadhaar number, income, or family details) don’t match official records, your application can be rejected.
Incomplete Documents
Missing documents or incorrect submissions (like an unreadable Aadhaar card copy) may lead to rejection.
Ineligibility for the Scheme
If your family doesn’t meet the eligibility criteria (income limits, age, category, etc.), your application may be rejected.
Duplicate Applications
If you’ve already applied for the same scheme before or submitted multiple applications, the system may reject the latest one.
Data Entry Errors
Sometimes, simple mistakes during the application process (like typing errors) can cause the system to reject your application.
You can also read: How to Access YSR Welfare Schemes on Navasakam Portal (2026)
Step-by-Step Guide to Resolve a Rejected Navasakam Application
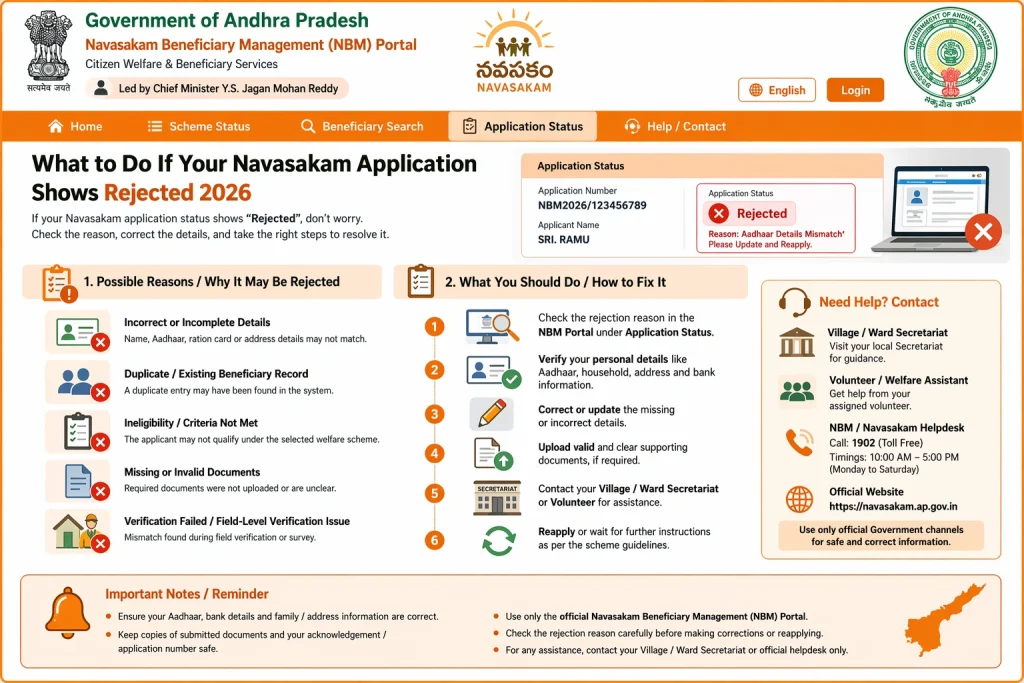
If your application has been rejected, here’s what you can do:
- The first step is to understand why your application was rejected. Follow these steps:
- Log in to the Navasakam Portal
- Go to the “Application Status” section and check the rejection details.
- The portal should provide a specific reason for rejection, such as missing documents or incorrect details.
- Once you know the reason for rejection, review your application thoroughly. Here’s what to check:
- Verify your personal details: Ensure your Aadhaar number, name, and family details are accurate and match government records.
- Check your income information: Make sure the income data you provided aligns with the required criteria for the scheme.
- Confirm document submissions: Double-check that all required documents (e.g., Aadhaar card, income certificate, etc.) were uploaded correctly and are legible.
If you find any errors or missing information, make the necessary changes:
- Correct details: If there were any mistakes in the information you provided, update your application accordingly.
- Upload missing documents: Ensure that any missing documents are uploaded in the correct format. If a document was unreadable, scan it again for better clarity.
After making these corrections, you can either reapply or follow the next steps.
If you believe your application was wrongly rejected or if the reason for rejection is unclear, you can submit a grievance.
- Find the Grievance Section: On the Navasakam Portal, look for the “Grievance” or “Complaint” section.
- Submit your appeal: Provide your application reference number, explain why you believe your application was wrongly rejected, and attach any supporting documents that prove your case.
You can also visit the nearest government office to request assistance with filing your grievance.
If your application was rejected due to eligibility issues or duplicate applications, you may need to wait for the next application cycle or check if there are any updates to the eligibility criteria.
Reapply for the scheme: Once any issues are resolved, you can submit a new application.
Check eligibility criteria: Ensure you meet all the requirements for the scheme.
Tips to Avoid Rejection in the Future
To avoid the hassle of rejections in the future, keep these tips in mind:
FAQs
Final Words
Having your Navasakam application rejected doesn’t have to be the end of the line. By understanding the reason for rejection, correcting any errors, and submitting the required documents, you can increase your chances of getting accepted next time. Remember, patience is key — especially if you’re submitting a grievance or appeal.
By following the steps outlined above, you’ll be able to resolve issues and get your application back on track quickly. If you continue to face problems, don’t hesitate to reach out to the Navasakam support team for assistance.