How to Raise a Grievance on Navasakam Portal: Step-by-Step
If you’re facing issues or discrepancies while applying for welfare schemes through the Navasakam Portal (NBM) and need to raise a grievance, don’t worry! The process is simple and designed to help you get the assistance you need quickly. This guide will walk you through the steps to file a grievance on the Navasakam Portal.
What is a Grievance?
A grievance is an official complaint that you can submit when you face problems such as delays, missing information, technical errors, or any other issue related to your application on the Navasakam Portal. Raising a grievance ensures that your issue is addressed by the authorities.
You can also read: How to Change Scheme in Navasakam Portal After Submission
Step-by-Step Process to Raise a Grievance on the Navasakam Portal
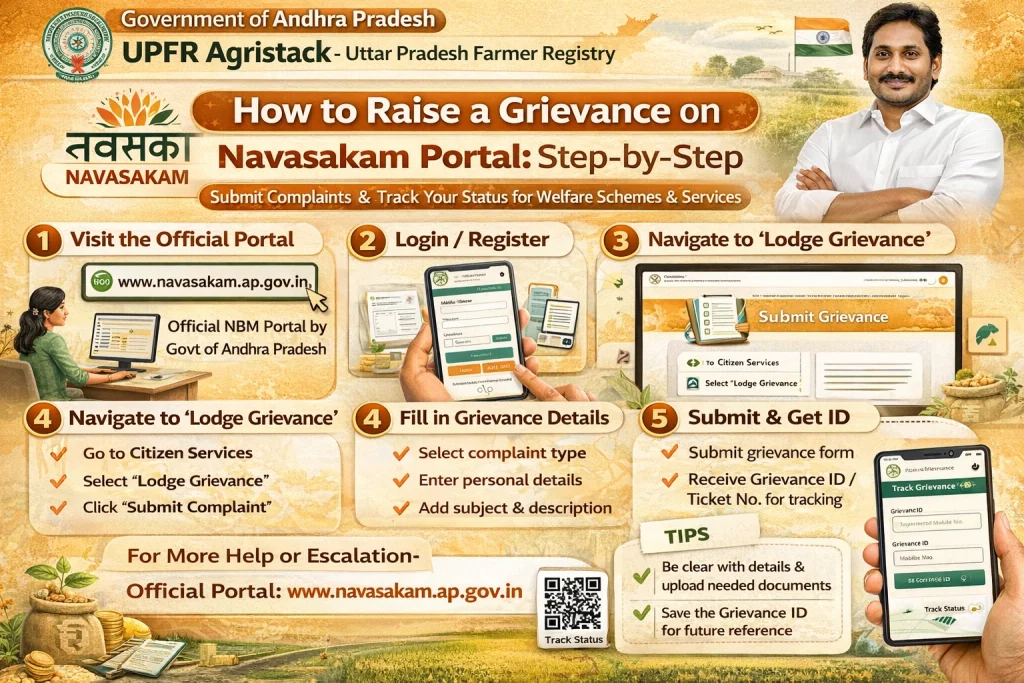
Step 1: Visit the Navasakam Portal
Start by going to the official Navasakam Portal. You can access it using the web address provided by your state or district government.
Step 2: Login to Your Account
Step 3: Navigate to the Grievance Section
Once you’re logged in:
Step 4: Select “Raise a Grievance”
In the grievance section, you should see an option to “Raise a Grievance” or “Submit a Complaint.” Click on it.
Step 5: Fill in the Grievance Form
You’ll be prompted to fill out a form with the following details:
Nature of the Grievance: Select the type of issue you’re facing (e.g., document upload problem, application status issue, or technical error).
Details of the Grievance: Provide a clear and concise description of the problem you are facing. Mention any specific error messages, delays, or issues that need resolution.
Attachments (if any): Upload any supporting documents or screenshots that can help clarify the issue. For example, if you received an error message, attaching a screenshot would be helpful.
Step 6: Enter Contact Information
Step 7: Submit the Grievance
Once you’ve filled out all the necessary fields, review the information to ensure it’s accurate. Click on the “Submit” button to send your grievance.
Step 8: Receive Acknowledgement
After submission, you should receive an acknowledgment receipt or reference number confirming that your grievance has been raised successfully. Keep this reference number safe, as it will be required for follow-up inquiries.
Step 9: Track the Grievance Status
Once the grievance is raised, you can monitor its status:
What to Do If Your Grievance Is Not Resolved?
If your grievance is not addressed within the expected time frame, follow these steps:
Contact the Navasakam Help Desk or Seva Center: Visit your local center to get help in escalating the grievance.
Re-Submit: If the issue is still unresolved, you may need to re-submit the grievance with additional details or clarification.
Follow Up: Use the reference number to regularly follow up on the status of your grievance.
Things to Keep in Mind When Raising a Grievance
Be Clear and Specific: Provide as much detail as possible, including screenshots or documents, to ensure your issue is understood correctly.
Keep Copies of Everything: Always save the acknowledgment receipt, any emails, or messages from the authorities, and follow up if necessary.
Respect Deadlines: Some grievances may be time-sensitive, so it’s important to follow up regularly and escalate the issue if required.
FAQs
Final Words
Raising a grievance on the Navasakam Portal is an easy process that helps you resolve issues and ensure your application progresses smoothly. By following the steps above, you can quickly submit your complaint and track its resolution.
If you face persistent issues or delays, don’t hesitate to visit a local Seva center or get in touch with the relevant authorities. They are there to assist you in navigating the portal and solving your concerns.